THE LOSS OF USS HORNET
At 1335 hours, Enterprise had completed recovery of all aircraft including those from Hornet. At this stage, Rear Admiral Kinkaid decided to break off action and withdraw his task force. He signalled Vice Admiral William F. Halsey at Noumea that he was unable to provide fighter cover for the crippled Hornet. This effectively meant abandoning Hornet to her fate.
From the moment that the last Shokaku plane withdrew at 0925, frantic efforts were undertaken to save Hornet. LCdr Homer W. Carter, USN (Ret.) takes up his story again:
"We were hit by torpedo planes and dive-bombers on the morning of 26 September 1942. The first two torpedos hit the forward and after engine rooms. Hits from a third torpedo and a bomb knocked out both emergency diesel engines, forward and aft. The big guns, the 5-inch anti-aircraft guns, had to be trained and pointed manually as we had no electrical power. Some of the smaller guns with circulating water for cooling, such as the 1.1 two barreled automatic weapons, got too hot without the cooling. We had our work cut out for us to put the fires out. We had to do it without electrical power and pressure on the fire mains. We used dry foamite out of five gallon cans and salt water pulled up from the side. Commander Guinn, the flight officer, came up to me and said, 'Carter, why don't you sailors use the fire hoses?' I said, 'Commander Guinn there is no electricity and pressure on the fire mains.' He was in deep shock, unable to comprehend."
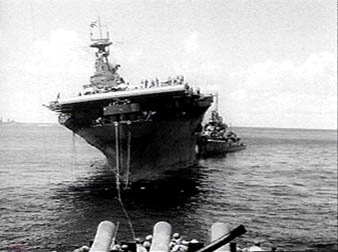
In a desperate attempt to save USS Hornet, the heavy cruiser USS Northampton has taken the crippled carrier in tow. The eight degree list to starboard is clearly visible. It was at this time that the second fatal attack was made on Hornet by torpedo bombers from Junyo.
The carrier's escort destroyers Morris, Russell, and Mustin came alongside and passed fire hoses to Hornet's crew. By 1000, all fires had been brought under control, and working by the light of hand lanterns, the ship's engineers were attempting to restore engine power. While the "black gang" were toiling frantically to save their ship, Homer Carter recalls how he took part in the gruesome task of collecting dead bodies for burial:
"By 1100 or so, we had all the fires out on the ship. Our arm muscles were like steel bands. The doctor told us it was the extra adrenalin that was allowing us to do twice as much in an emergency. Then we had the awesome job of finding about 220 bodies, identifying them, and burying them over the fantail in mattress covers with fire bricks in them to weight them down."
While the engineers were labouring to restore engine power, the heavy cruiser Northampton prepared to take Hornet in tow. This activity was interrupted by the arrival of a lone dive-bomber from Shokaku. The attack by this Val produced a near miss on destroyer Morris, and caused the attendant warships to cast off lines and disperse. Hornet was finally taken under tow by Northampton at 1130, but the dead weight of the carrier prevented the cruiser achieving a speed above four knots. After about ten minutes, the tow-line parted, and at 1145, Rear Admiral George D. Murray shifted his flag from Hornet to heavy cruiser Pensacola. The seriously injured and those who could not assist in the salvage work were then transferred to the escort destroyers.
At 1455, when Hornet's crewmen had secured another line to Northampton and the carrier was moving through the water at three knots, news was received that enemy aircraft were approaching. This was the second strike group from Junyo. At 1520, the strike group leader sighted the Hornet under tow and the Japanese prepared to attack. With Enterprise having been withdrawn from action, there were no Wildcat fighters to defend the crippled carrier. The tow-line was severed and Northampton took evasive action. Although reduced to manually operated guns, the gunners on Hornet joined with the gunners of their escort warships to send out a powerful challenge to the approaching Kates. Several Kates and their attendant Zeros were shot down, but one torpedo was released at Hornet and found its mark. Immediately prior to the Junyo attack, Homer Carter and his team had been still engaged in recovering bodies, and were looking for a young Marine named Church. He describes the Junyo attack:
"We had located all the dead and wounded except for one Marine. His name was Church and he was tall and a little heavy and the Marines were always on him to get his weight down, and to keep it down. His work station was in the laundry issue compartment - so everyone knew him. He was a nice fellow and everyone liked him, because he was so friendly. His battle station was on one of the 1.1 guns outboard of the island structure. I was with the team (one corpsman and three other sailors) that found him about 1450. He had been badly hit in every one of his main arteries and had been blown behind an armored blast shield. The corpsman said that he had lost all of his blood and fluids, and weighed about 70 pounds as we picked him up and put him in the mattress cover. I wanted to cry, but the tears wouldn't come. I was dry eyed like the other three sailors."
We'd started aft with his body, and halfway from the flight deck was a little platform deck just outside the radio transmitting room. As we reached this platform deck, a boatswain's mate from the flight deck shouted "Air attack, torpedo attack!" I was outboard from the radio transmitting room's door and hatch so the other three went inside and dogged the hatch closed. I went running back up to the flight deck, leaving Church's body on the platform deck. I had just closed the hatch to the flight deck when another 900-pound Japanese torpedo hit the Hornet amidships, right under me and went off knocking me flat on the deck."
Seawater poured into the carrier through this new breach, and the ship was soon listing at an angle of fourteen degrees. Captain Charles P. Mason realised that Hornet was now beyond saving, and sadly passed the word to prepare to abandon ship. The Junyo attack was a last bitter blow for those on Hornet like Homer Carter who believed that there was still hope of saving their ship:
"We were now listing so much to starboard that the side of the hangar deck was at the water level. Captain Mason at this time had the boatswain's mates pipe "abandon ship" throughout the ship. When the last torpedo hit the Hornet, the cruiser Northampton was towing us at about five knots and in another half hour the engineering crew would have had one screw turning. Had this happened we might have saved the Hornet."
At 1540, while preparations to abandon Hornet were under way, the aircraft from Zuikaku's third strike came into view. The two Vals achieved near misses on Hornet and cruiser San Diego. The six Kates attacked next, and were only able to achieve one hit on Hornet's flight deck.
At 1550, having been apprised that Kondo's battleships were approaching the stricken Hornet, Vice Admiral Halsey ordered a general withdrawal.
During the last attack, Hornet's list had reached an alarming eighteen degrees. It was time to leave her. Captain Mason was the last to leave at 1627.

Despite the best efforts of the gunners on Hornet and her escort warships, the second attack on Hornet by torpedo bombers from Junyo doomed Hornet. As the carrier's list increased alarmingly, Captain Charles P. Mason reluctantly gave the order to abandon Hornet. Crew members are shown in this image preparing to leave their ship. Some are already in the water and awaiting rescue by attendant destroyers.
LCdr Carter describes the abandonment of Hornet:
"Everyone had on a kapok life jacket, and we saw to it that all the wounded had on a kapok life jacket. We released the large doughnut type kapok life rafts that carried about twenty men with each standing. We assisted the wounded over the side first and put them into the rafts. As I went over the side of the Hornet for the last time, I looked into the amidships hangar bay and saw oil bubbling up in the hangar deck, and Church's body had been blown out into the center of the hangar deck.
We quickly swam to the life rafts containing the wounded, about 150 yards from the Hornet. Then we tried doing what the doctors told us to do if bombs exploded in the water close to us. They felt the concussion in the water from exploding bombs would force one's intestines out one's rectum. Well first of all, with a kapok life jacket properly worn, one cannot get his head under the water, nor his rectum out of the water. This was very comical and we kept laughing at each other like a bunch of monkeys at a banana feast. It's funny because at the time we were not worrying about sharks, and were not worrying about Zeros strafing us in the water.
The cruisers and destroyers would start slowing down to pick us up and then the Japanese dive bombers would come over dropping bombs on the Hornet. The ships would speed up and start shooting again and as a result we didn't get picked up until late afternoon. The destroyer Anderson DD-411 picked me up and about 240 others from the Hornet."
The escort warships were still recovering Hornet survivors at 1702, when four Vals from Junyo appeared and launched a final attack on the carrier. One bomb hit Hornet but caused little additional damage.
With the approach of nightfall, Vice Admiral Kondo decided to seek a night battle with the Americans and ordered the warships of the Advanced Force and the Vanguard Force to converge and close at high speed with the withdrawing American ships.
From heavy cruiser Pensacola, Rear Admiral Murray signalled the destroyer Mustin at 1810 to scuttle Hornet. The destroyer fired eight torpedoes at Hornet. Two ran erratically. One exploded prematurely. Five struck the Hornet, but only three exploded. The three that exploded against the hull produced little apparent effect. This episode speaks volumes about the unreliability of American torpedoes at this time and the consequences of denying adequate funding for defence.
The destroyer Anderson was detached to aid the scuttling of Hornet. Despite scoring six torpedo hits on Hornet's hull, the carrier stubbornly refused to die and was still afloat at 1930. The two destroyers then began to fire 5-inch shells into Hornet. Floatplanes from Vice Admiral Kondo's approaching warships watched the activities of the two destroyers with close interest, and reported what they were seeing to Kondo. At 1920, Rear Admiral Ugaki signalled from battleship Yamato at Truk that Hornet was to be captured and taken in tow.

The crippled Hornet is silhouetted against the late afternoon sun. The carrier has been abandoned, but refuses to sink. The Japanese are determined to capture her and the Americans are equally determined to ensure that their carrier does not fall into Japanese hands.
In response to Ugaki's signal, Kondo ordered a destroyer squadron to close with Mustin and Anderson and engage them. At 2015, Mustin's radar detected an approaching surface contact but Hornet was still refusing to sink. The two destroyers continued to fire 5-inch shells into Hornet until the carrier was burning fiercely and racked by explosions. With their radar indicating that enemy vessels were fast closing with them, Mustin and Anderson departed the area at 2040. Twenty minutes after the American destroyers had left, two Japanese destroyers arrived to find Hornet burning from bow to stern and unsalvageable. After identifying the burning carrier as Hornet, they ensured her end with four deadly Long Lance torpedoes. Hornet finally sank at 0135 on 27 October, taking one hundred and eighteen officers and men to rest with her on the bed of the Pacific. Her loss coincided with Navy Day in the United States.
The fuel situation for Kondo's forces was becoming critical by midnight on 26 October, and Admiral Yamamoto ordered a withdrawal to Truk unless a dawn air search to the east on 27 October revealed the presence of American warships. When none were found, Kondo directed all ships to set course for Truk.
In the Battle of the Santa Cruz Islands, the Japanese sank the carrier Hornet, and damaged the carrier Enterprise, the battleship South Dakota, the cruiser San Juan, and three destroyers. The Americans inflicted heavy damage on the Japanese carriers Shokaku and Zuiho, and the heavy cruiser Chikuma. All three were put out of action for several months. Santa Cruz deprived Yamamoto of the services of two carriers and a cruiser that the Imperial Japanese Navy desperately needed during the crucial naval battles that would follow off Guadalcanal
Japan suffered heavy losses of aircraft and aircrews at Santa Cruz. Vice Admiral Kondo entered the battle with 198 operational carrier planes. 97 were lost in the battle, and only 86 of the remainder were still flyable. Even more damaging for Japan was the loss of 148 experienced aircrew. Many of these were veteran pilots who had acquired their fighting skills in both China and the Pacific theatre, and could not be replaced in time to stem the tide that had begun to turn against Japan at Midway.
The United States entered the battle with 136 carrier aircraft, and lost 81 aircraft and 24 flight crew of whom four became prisoners of war.
How did the Japanese win a tactical victory at Santa Cruz?
It is clear that Santa Cruz was on balance a tactical defeat for the United States. It is not difficult to assign reasons for this defeat.
Earlier in this short history, I mentioned that Santa Cruz was beginning to follow the Coral Sea pattern early on the morning of 26 October. In the Coral Sea scenario, where air strike groups pass each other on the way to the enemy's carriers, a very significant edge will usually lie with the task force that has the greatest number of the following features: an adequate number of fighter planes when and where they are needed, effective radar detection, effective fighter direction, reliable communications, experienced pilots, effective ordnance (e.g. bombs and torpedoes), a properly coordinated attack, and effective anti-aircraft protection. The Japanese appear to have had all of these at Santa Cruz. The Americans had effective anti-aircraft protection at Santa Cruz, and Hornet had experienced fighter and dive-bomber pilots. The other important features were, more often than not, missing when most needed by the Americans.
Aspects of the management of the battle from the flagship Enterprise left much to be desired, and these aspects have been addressed during the course of this history. The very poor quality of the fighter direction from Enterprise was severely criticised by both fighter squadron commanders. It almost certainly contributed to the loss of Hornet which was left dangerously exposed to the forty-one bombers in the first strike. There were only twelve Zeros left to protect those bombers as they approached Hornet. If the thirty-seven American Wildcats of the combat air patrols had been effectively vectored to the correct altitude and position to intercept this strike group before its planes were entering their high speed attack modes, it is reasonable to conclude that many of the Japanese planes would never have survived to attack Hornet.
Despite still having two undamaged fleet carriers at his disposal and overwhelming naval strength, Admiral Kondo's operational capabilities were severely hampered owing to the number of aircraft and aircrews that he had lost at Santa Cruz. With Admiral Yamamoto's approval, Kondo withdrew the whole of his large naval force to Truk early on the morning of 27 October.
General Maruyama launched his attack on the US Marines at Henderson Field on the night of 23/24 October 1942. His troops received no support from Admiral Kondo's massive naval force which had withdrawn to Truk. In desperate fighting over two days, the US Marines repulsed General Maruyama's assault, and the Japanese troops withdrew after suffering heavy losses.
NOTE: This short history of the Battle of the Santa Cruz Islands is followed by a gripping account of his part in the battle by one of Hornet's SBD dive-bomber pilots, Commander Clayton Fisher, USN (Ret.).